 Leather can last a lifetime if properly cared for. Leather interior for vehicles like your classic car endures the wear and tear of supporting you and your passengers while driving and the friction of getting in and out of the vehicle. Your leather interior also has to brave elements like the summer sun and the cold temperatures of winter.
Over the years the wear and tear can start to show and cracks and worn out patches will begin to show. Before you rush out to buy new seats or have them reupholstered, you should give your leather a chance at being restored. As long as there is some integrity to the leather then there is a chance that the interior can be restored.
There are some incredible leather restoration products and kits available that will help you restore your leather fairly easily. We have had great results in the past using Gliptone’s Liquid Leather Scuff Master Automotive Kit, which can be purchased online or possibly in a local automotive parts store. Lexol Leather Care and Leather World Technologies also have good customer reviews.
Regardless of the leather restoration kit that you choose the first step you need to take is to color matching. You will need to either send in a color swatch to the distributor or send the manufacturer’s color code or color name to get the right kit color for your interior. There may be a spare leather swatch under the seat provided by the manufacturer just for this situation.
Once you have the correct kit you should then remove as much of the leather from the vehicle as possible to make it easier to work on. We suggest fully removing the seats from the vehicle if possible.
This first part of the restoration process requires a proper cleaning of the leather. Use the hand tool of your vacuum cleaner along with the soft bristle brush attachment to thoroughly remove the dirt and grime that has worked its way down into the seams.
After you have vacuumed out all the dirt and debris you should use the leather cleaner from your kit to remove any left over dirt the vacuum could not get. Apply the cleaner to a soft clean cloth or damp sponge and rub in a circular motion to loosen any left over grease or grime. For any tougher stains or grime you may need to use a soft bristle brush to help release the dirt from the leather. The last step in cleaning the leather is to remove and left over cleaner residue and the gently wipe the leather with a mild solvent like isopropyl alcohol and allow the leather to completely dry.
Now that you have cleaned the leather well you are basically ready to begin restoring the leather. Examine any worn out or faded areas on the surface of the leather to determine if the quality of the leather still has sufficient integrity. If it is torn or super thin you may need to replace the leather rather than restore it. All imperfections at this point can become much more noticeable after applying a color dye. It is possible to CAREFULLY remove these imperfections by using a fine 600 grit sandpaper followed by another round of cleaning.

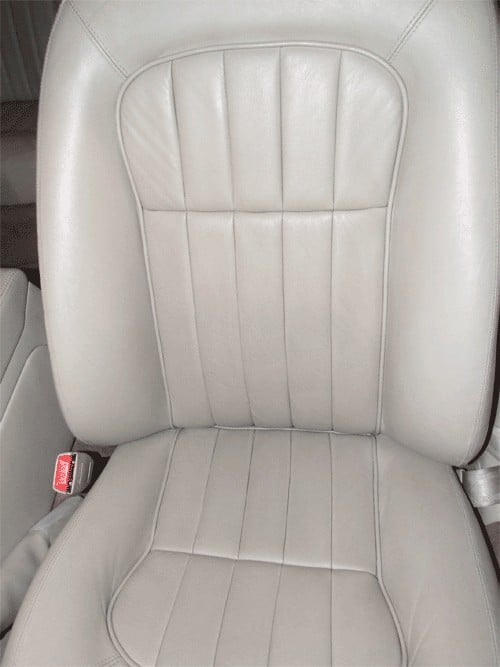
You can see in the image above that there are a number of creases and an area that has become worn out and lost color, but the leather is still in tact. This makes for a prime candidate for a leather restoration. At this point you should test the color from your kit on a small area to ensure there is a color match. You may need to apply a toner to slightly adjust the coloring. If you are happy with the color match, you can then apply the product by following the manufacturer’s directions. The will sometimes instruct that it is applied with a spray gun, a soft bristled brush or a sponge. We find that a sponge gives the best results and that a spray gun can create a mess so proceed with caution.
For the creases and cracks you can dilute the product with water (about 30%) and then rub it into the leather. Allow the product to dry for a few minutes and then wipe it clean with a damp cloth. The product should come off the the good leather, but remain within the cracks and creases.
After you have filled in the creases on the entire seat you can then focus on any faded areas where the color has been worn away. You can apply the undiluted liquid leather to this area and let it completely dry. We suggest using a low temperature hair dryer to accelerate the drying process. You may need to repeat this step multiple times to achieve the desired results. One more final coat can then be applied (diluted with water 20%) and finish off this step by wiping everything down with a clean and dry cloth.
Allow the leather to absorb the product and completely dry overnight. You can then apply the leather conditioner that is in your restoration kit to bring out a nice rich look to the leather. Liquid Leather Scuff Master is known to work well and not rub off on wet or dry clothing after it has been applied and allowed to set in overnight. Your once worn out seats should now look like they did before anyone sat in it them for the first time.