

Electrical systems in cars, especially older cars and trucks, can be tricky to diagnose and repair if a serious electrical issue occurs. Fortunately, if you experience something not working with an electrical component in your classic car or truck, there is a good chance it is simply a fuse that needs to be replaced. All auto manufacturers install fuses in a fuse box to help prevent circuits from overheating, which can easily damage components, or even start on fire.
Fuses are created to take a certain amount of current flow before they will burn up (a.k.a blown fuse). Typically speaking, fuses are rated to accept double the normal amount of amperage the circuit requires for normal operation . Using them significantly increases the chance of your electrical system components surviving an electrical surge or spike.
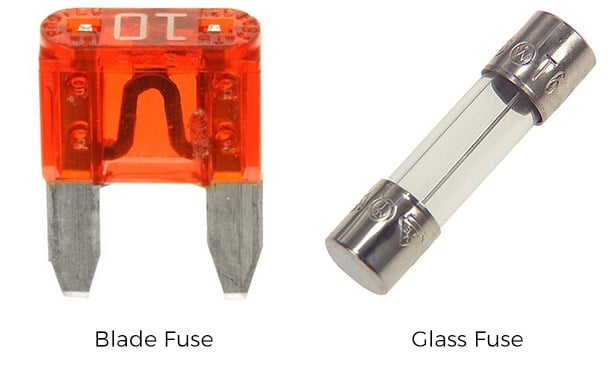
In most classic cars and trucks you will find two types of fuses. Sometimes called spade or plug-in fuses, automotive blade fuses are widely used. The other type of fuse is a cylindrical glass fuse. Both operate in the same manner. When a fuse has more electricity flowing through it than it can safely handle, a conductive metal strip running through the center is designed to literally break apart to ensure all current is stopped.
We are going to explain how easy it is to find, inspect, test and replace an automotive fuse. Before we get started, let’s take a look at some of the tools we will need for the job.
- Fuse puller tool or needle-nose pliers
- Multimeter/Voltmeter or test light
- New fuses (same amp rating as blown fuse)
- Small flat head screwdriver and flashlight (may possibly need)
When an electrical component in your vehicle stops working, the first thing to check is for a blown fuse. You may need to consult your owner’s manual to locate your fuse box, but they are typically located underneath the dashboard or on the driver’s side of the dashboard. There may also be a fuse box located under your hood. If you are having trouble locating your fuse box, a quick Google search should quickly get you an answer.
When removing the fuse box cover/panel (using the Flathead screwdriver if necessary), you should discover a diagram on the inside that lists all the fuses, what components they protect, and the required amp rating. If there is no diagram, you may want to refer to the owner’s manual or the internet to find one. It is much easier to locate the fuse that has gone bad using a diagram.
Once you locate the fuse in question, you will need to remove the fuse using the fuse puller tool or needle-nose pliers. Use caution when removing a glass fuse. They can be sharp if they break, so we suggest using a plastic puller tool for these. Also the fuse connecters may come into contact with a pliers and could potentially short out the system.
Once you have a good hold of the fuse, pull it straight out away from the fuse box. You may need to wiggle it a little to set it free. After removing the fuse, give it a visual inspection. If the metal strip or wire inside the fuse is broken it will need to be replaced. The most important thing when replacing a fuse is to use the recommended amp rated fuse. Never, ever use a lower or higher rated amp fuse.
It is not always apparent that a fuse is broken with a visual inspection. There could be a hairline break in the metal strip that just can’t be seen with the naked eye. If you see nothing wrong with the fuse, do not just assume it is ok. It needs to be tested with a multimeter or a test light.
When you use the multimeter to test a fuse, set the meter to read Ohms. Then touch the positive lead of the meter to one metal end of the fuse and touch the negative lead to the other. If the fuse is good you will get an ohm reading. If there is no reading then the fuse is bad.
If you are using a test light, connect the clip or clamp on the test light to a known ground in the car. With the fuse seated in its fuse box socket, touch the tip of the test light to the exposed metal part on the top of the fuse. There are two exposed metal tabs, one on each side. Be sure to touch both. If the test light illuminates on both, the fuse is good. If it only lights up on one, the fuse needs to be replaced.
Once you have found a fuse that has blown and needs to be replaced, simply push the same rated fuse back into the open slot. Fuses are designed to break from time to time. It is really no cause for concern. If you put a new fuse in and it breaks quickly, you will need to diagnose the problem further as it is likely not a fuse.